
Getting started with Express.JS (Javascript)
Setting up your first Express.Js server


Hello and Welcome!! 🤩🤩🤩
I am super excited to write this article, and I hope you have as much fun reading it as I did writing it.
Let us understand what servers are and what Express is in Javascript.
What is a Server?
Servers are the backbone of computer programs, providing top-of-the-line service to clients. These devices operate in the heart of data centers, where their physical presence alone commands respect. It's no wonder they're referred to as servers; they truly serve as the ultimate source of support for the digital age.
What is Express.JS?
Express.js, also known as simply Express, is a robust server-side web application framework that is mainly utilized for building RESTful APIs with Node.js. It is free and open-source software that is distributed under the MIT License, making it accessible to developers worldwide. The framework is widely popular among developers due to its ease of use and flexibility, making it ideal for building web applications and APIs. In fact, it has been considered the standard server framework for Node.js, with its versatility and efficiency making it a top choice in the development community.
Knowing now that Express is a NodeJs framework, we will be relying a lot on the use of NodeJs, especially for the installation of Express.
Installing Hyper Terminal
Please note that it is completely okay to use your Os' inbuilt command terminal. I prefer using Hyper Terminal, and that is what I'd be using throughout this article.
A guide on how to download and install the hyper terminal can be found on their documentation page here
Installing NodeJs.
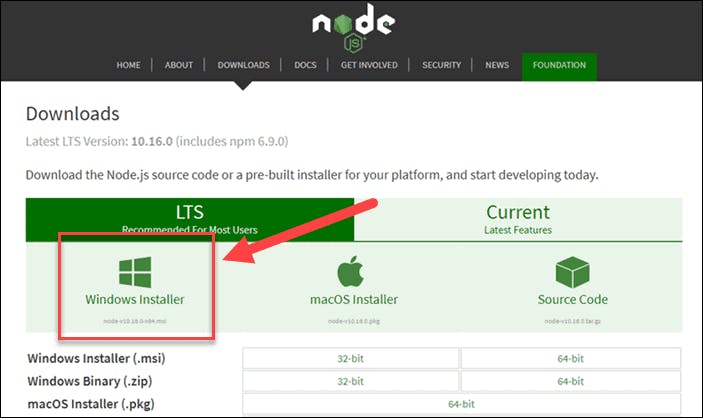
This is a preliminary step to achieve our goal as we will be needing a feature of Nodejs, which is its package manager, NPM (Node Package Manager). A complete guide on how to install and set up Node on your computer can be found on the documentation page here. Choose which OS you use, and follow the prompts as you go. I use a windows laptop, and that's why the windows installer is highlighted. 😅😅
Creating your first Express server
Having finished the first two steps, it is time for us to get right into it!!
On your hyper terminal, you create a new directory on your desktop with the following command
mkdir express fileGo ahead to create a new file inside this directory by using the following command.
touch server.jsStill, in the same directory, we run
npm initand follow the prompts where necessary.For the purpose of this tutorial, I am using the Atom code editor. To open up our
server.jsfile in Atom: we, still in the same directory, use this commandatom .The next step is to install ExpressJs. From the documentation, we see that all we have to do is run this command
npm install expressin our terminal (still in the same directory). This installs the Express package onto our local computer.
After this is done, we can go ahead to create our first server!!! 💃🏾💃🏾💃🏾
In our code area, we type in the following...Don't worry, I'd explain.
 //jshint esversion:6

 const express = require('express');

 const app = express();

 app.listen(3000);
Our first line of code is a comment (that is specific to Atom), telling Atom that we are using ES6 so that it doesn't shoot a bunch of errors at us.
The next line is us requiring Express. That is fetching Express from the installation pacakage***.*** We store this in a variable.
The next line is fetching the Express module or method, and storing it in a variable
app.The last line is us calling a property of the
expressmethod,listen, to listen on the port 3000. This simply means that we are creating a (local) server on port 3000.
Starting up your server
Back in our terminal, we enter the command node server.js. This starts up our server. We will know that this is successful when, after executing the command, our terminal ceases to generate the usual prompts for us. This indicates that the server is on.
We can, however, go a step further by adding an anonymous function to our listen property.
//jshint esversion:6

const express = require('express');

const app = express();

app.listen(3000, funtion(){
console.log('The server has started on port 3000')};
You will see the console message spin-up on your terminal window when you start the server. This shows you that your server has started running.
To exit the server on the terminal, type ctrl + c or cmd + c.
There you have it, your very first server!
There are lots and lots of cool and interesting things that we will be doing with Express-js, but that is all for this article. Catch you next time!